
Just Paint Them!
The front of our house needed only the smallest of tweaks when we moved in! Okay, a major paint job was what it needed desperately, but leaving that aside: I focused on the fact that our nice arroyostone piers were covered in sad, gray paint. This just wouldn’t do. I was working on a historic landmark in town for some specialized prep and painting in a new exterior color scheme. The preservation contractor doing it was perfectly capable of returning the piers on our house to the state they should have been LEFT in years ago, so I couldn’t help it—I asked him to come by and look at my place. He did, and then came back and applied a test patch of stripper and covered it in plastic for a few days to see if anything came off.

AAAUGH!
This is what we found underneath the gray layer.

Test was successful. Let’s do it!
Applying the next layer over the horrible green ooze. Can you imagine what it would have looked like with the shingles and the stones all the same color!?

All slathered and covered in plastic!
Now we wait for the results. I will be honest, this is not the greatest thing ever built with arroyostone, but it’s got to look better in its unpainted state.

Now HERE is some real artistry in arroyostone! But I digress.
(garage designed by Charles Greene for his new Hudson, 1914)

And here’s the newly finished result!
I was surprised by the black mortar, but once I started looking at similar features on other houses in the neighborhood I saw that it was pretty common.
The (mis)alignment of the pillar, cap, and column above makes me suspect that this house was built with day labor.

This little project wasn’t cheap, but it was visually impactful and totally worth the $1,800 to me (I know that some people take on such projects themselves or DIY-remodel their whole kitchen for that much; we are not that family). The warm gray of native granite is an important part of a local bungalow’s color palette. This photo above, with the stones looking so handsome, was taken before we planted a lot of plants in front of them.
But wait—there was one interesting discovery to be made as a result of this project! Below is my sketch of what I figured out, quite unexpectedly, once the paint was off.
(Is there even a name for a quadrilateral with only one right angle and no parallel sides? This is just wrong.)
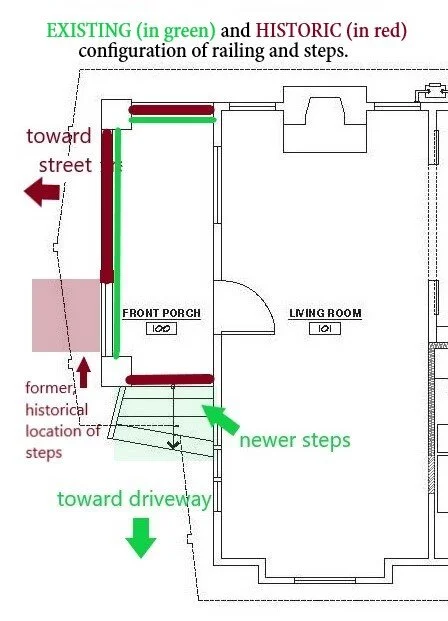
The removal of the paint exposed several rectangular patches filled with concrete (see photo below at end of this post) that revealed the original attachment locations of the porch railings. The approach to the porch had originally led straight to the front door (as shown in red how it was), not a side-approach from the driveway (shown in green how it is now)! Remember that there was no driveway until they added a proper one in the 1920s, since there was no garage back there until that decade, either, and everyone would have arrived from the sidewalk. I took a walk around the neighborhood and noted that the great majority of the other bungalows also have a front walk on axis with the front door, perpendicular to the sidewalk. It made perfect sense. We seriously considered putting it back where it belongs, since we were just embarking on a new front landscape project and that would have been the moment to reconsider the approach to the porch. But it was too much to take on at that moment. We left the ugly concrete steps and metal railing in place and didn’t return the walk to its rightful place. Can’t do everything (right?).
So far, we have not discussed tearing out and rebuilding those concrete steps and putting in a new railing as part of the scope of this project (in the current location). But with the adjacent cladding being replaced, this would be the time to do it so that those two materials and surfaces come together properly, not as an afterthought. Thinking about this gives me a major case of itchy change-order finger! Why didn’t I think of it when the concrete demo team with the enormous jackhammer was on site earlier this week!?
I guess we’ll see by the end of the project which way this went!

See that rectangle filled with concrete? Several of these, revealed by the paint removal, show where the original railing attachments were.